If Caffeine & Liquor Had a Baby
You know how sometimes you “need” something, but it’s not important enough to invest the time, money, or effort into buying it so you get creative and make do? I’m talking little things here like popping your water flavor packets in a bell jar to sit on your counter rather than going out and buying something to hold them or leaving the ugly box sitting around. That’s always fun when you’re able to repurpose little things like that and it turns out cute and intentional looking.
Wanna know what’s even more fun? When you don’t realize you need something, but you see an empty container on the floor next to the garbage can and you think, I could make something with that. So, then you open your craft closet, and you see another empty container you saved from the overflowing landfills last month and from there, the pieces start falling into place. Before you know it, you have something you didn’t know you “needed” and you’re all heart eyes over it.
This is the story of how Mike and his Death Wish turned into the cutest little pen caddy you’ve ever seen, and bonus, it’s the perfect complement to a quilt I sewed last year! Where’s the hearty eye emoji?


The Backstory
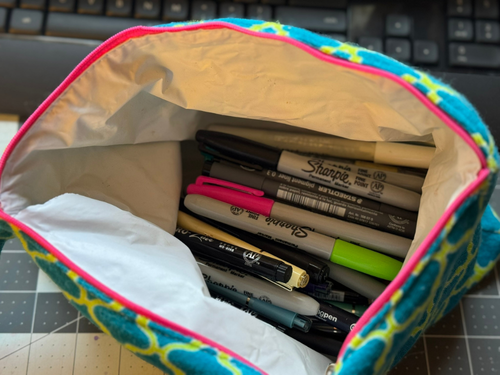
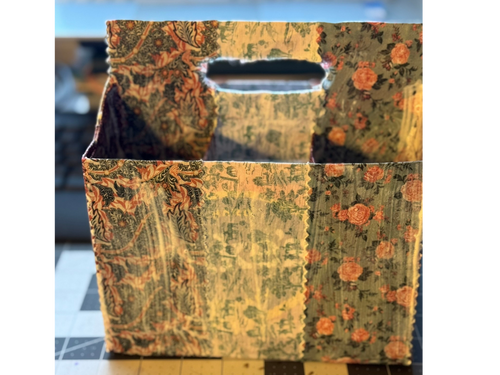
My daughter and I doodle almost every night in the living room. It's our thing. I've been carrying around all of our pens in an old bag with a broken zipper for months because, honestly, who has time (or $!) to go shopping for a pen holder? But then I spotted an empty Mike's Hard Lemonade 6-pack box sitting by the trash, and something clicked…said the chick with eleventy hundred empty TP and paper towel rolls sitting in her craft closet. But this was basically begging to become something useful.
I grabbed it, opened my craft closet (where I apparently save all the things - see above), and found an old Death Wish Coffee box I'd been hoarding. That sturdy cardboard was exactly what I needed to reinforce the bottom. And then I remembered the leftover jelly roll fabric strips from a strip quilt I made last year—the same coordinating prints that are on the throw I curl up under while doodling. The universe was telling me something.
What You'll Need
The Containers:
1 (Mike's) 6-pack bottle carrier (the kind with the built-in cardboard divider and handle)
1 sturdy cardboard box (I used a Death Wish Coffee box, but any similar weight cardboard works)
The Materials:
Masking tape (for reinforcing seams and edges)
Fabric scraps (I used leftover jelly roll strips that were the perfect width for the box panels—about 2.5" wide)
Mod Podge (regular matte finish works great - I used gloss for the final coat)
Hot glue gun and glue sticks
Twine (for wrapping the handle)
Foam brush or regular paintbrush (for applying Mod Podge)
The Tools:
Scissors or craft knife
Ruler or measuring tape (if you're the measuring type - that would not be me)
Cutting mat (optional but helpful)
Step-by-Step: How to Make Your Own Upcycled Pen Caddy
Step 1: Reinforce the Bottom

The Mike's box is designed to hold bottles, not be a permanent caddy, so the bottom needs some love. Cut a piece from your sturdy cardboard box (mine was about 7.5" x 5" but measure your box bottom and cut accordingly) and attach it to the bottom exterior of the box using masking tape. Make sure it's secure—this is what's going to give your caddy stability.
Tip: Don't worry about it being pretty at this stage. The fabric will cover everything.
Step 2: Tape All the Seams
Using masking tape, reinforce all the edges of the box—the top rim, the corners, and especially any seams that feel weak. This box was designed for one-time use, so you're essentially giving it a second life. The tape adds structural integrity and also gives the Mod Podge something extra to grip onto.


Step 3: Start with the Fabric Strips
Here's where the magic happens. Take your fabric strips and start wrapping them around the box. The length of my jelly roll strips wrapped perfectly around the entire box, which felt like a small miracle. The width also happened to fit exactly in those cut-out panel spaces on the Mike's box.
Apply a layer of Mod Podge to one section of the box, press your fabric strip down, smooth out any bubbles or wrinkles, and keep going. When you get to corners, miter them (fold them like you're wrapping a present) for a clean finish.
For the interior: I eyeballed fabric pieces to line the inside compartments. Cut pieces that are slightly larger than the spaces, apply Mod Podge, press them in, and trim any excess. Don't forget to cover that cardboard divider too—it's part of the original box structure and it's a visual focal point.
Real talk: This is messy. Your fingers will be covered in Mod Podge. Embrace it. That's how you know you're doing it right.


Step 4: Seal Everything
Once all your fabric is attached and dry (give it at least 20-30 minutes), apply a final coat of Mod Podge over the entire exterior. This seals everything, gives it a slight protective finish, and helps blend all those fabric edges together. It'll look a little white and milky when you apply it, but it dries clear. Let it dry completely—at least an hour, longer if you can wait.
Bonus points if you spot the one stupid, rookie mistake that I made!
Step 5: Wrap the Handle
Thread your twine through the existing handle holes on the Mike's box. Wrap it tightly around the handle, covering the cardboard completely. When you get to the end, secure both ends with hot glue. Make sure those ends are really glued down—you don't want them coming loose when you're carrying your caddy around.
Tip: If you want extra security, add a dab of hot glue under the twine as you wrap every few inches.
Step 6: Final Touches
Step back and admire what you just created from literal garbage. Fill it with pens, markers, whatever you need to keep handy. Mine now lives on the coffee table, ready for nightly doodling sessions, and it coordinates perfectly with my strip quilt.
The Result


I now have this cute caddy that matches the quilt I cover up in while I doodle, holds all our pens without that sad broken-zipper bag, and cost me absolutely nothing. Zero dollars. Just scraps, empty boxes, and about an hour of satisfying, messy crafting. And please note how easy it was to camouflage that rookie mistake with a few homemade book thongs that absolutely do get used in the same space! More heart eyes.
The divided compartments keep different pen types separated (fine liners in one section, Sharpies in another, you get it), the handle makes it portable, and honestly? It looks intentional. Like I planned this. Like it wasn't just me seeing trash and thinking, "But what if..."
Variations & Ideas
Use different fabric patterns based on what you have on hand—this would be adorable in holiday prints, florals, or even solid colors
Try wrapping the handle with ribbon instead of twine for a different look
Paint the box instead of using fabric if that's more your speed
Add embellishments like buttons, patches, or hand-stitched details
Make it themed for specific crafts—one for watercolor supplies, one for knitting notions, one for journaling tools
Use other beverage carriers—hard cider boxes, soda six-packs, even those fancy olive oil gift box sets
Final Thoughts
This project is everything I love about making things: it's practical, it uses what I already have, it doesn't require perfection, and it turned out way cuter than I expected. Plus, there's something deeply satisfying about rescuing something from the trash and turning it into something you actually want to keep on your coffee table.
So next time you're about to toss that beverage carrier in the recycling, pause. Look at it. Really look at it. Could it be something else? Because I'm telling you, Mike's Hard Lemonade and Death Wish Coffee never imagined they'd team up to hold my Sharpie collection, but here we are.
Have you made something out of "trash" lately? What's your favorite zero-dollar upcycle? Share in the comments—I love hearing what other people create when they look at their recycling with fresh eyes!
Follow along on Facebook, Instagram, TikTok, and LinkedIn for visuals and bite-sized insights from this piece and others. And if this resonated, share it with someone else who gets it.
Sign up here to receive our newsletter and stay connected!
About the Author
Gal is an autistic artist, late-diagnosed at 49, and the creator of AuRTistic Expressions—a space where neurodivergent truth meets creative survival. Through books, blog posts, printables, and coaching, Gal explores what it means to unmask safely, communicate authentically, and make art that doesn’t ask for permission. Stick around—there’s plenty more where this came from.